 VueRouter
# VueRouter
# 认识
目前前端流行的三大框架, 都有自己的路由实现:
- Angular的ngRouter
- React的ReactRouter
- Vue的vue-router
vue-router是基于路由和组件的
- 路由用于设定访问路径, 将路径和组件映射起来.
- 在vue-router的单页面应用中, 页面的路径的改变就是组件的切换.
# 安装
目前Vue路由最新的版本是4.x版本
npm install vue-router@4
# 标签路由使用步骤
# 创建路由组件的组件
/src/pages/Home.vue
<template>
  <h2>Home</h2>
</template>

<script setup></script>

<style lang="scss" scoped></style>
2
3
4
5
6
7
/src/pages/About.vue
<template>
  <h2>About</h2>
</template>

<script setup></script>

<style lang="scss" scoped></style>
2
3
4
5
6
7
# 配置路由映射
组件和路径映射关系的routes数组;
通过createRouter创建路由对象,并且传入routes和history模式;
/src/router/index.js
import { createRouter, createWebHistory } from 'vue-router'
import Home from '../views/Home.vue'
import About from '../views/About.vue'

const routes = [
  {
    path: '/',
    redirect: '/home',
  },
  {
    path: '/home',
    component: Home,
  },
  {
    path: '/about',
    component: About,
  },
]

const router = createRouter({
  history: createWebHistory(),
  routes,
})

export default router
2
3
4
5
6
7
8
9
10
11
12
13
14
15
16
17
18
19
20
21
22
23
24
25
/src/main.js
import { createApp } from 'vue'
import App from './App.vue'
import router from './router'

createApp(App).use(router).mount('#app')
2
3
4
5
# <router-link>和<router-view>
通过<router-link>和<router-view>,使用路由:
/src/App.vue
<template>
  <div>
    <router-link to="/home">Home</router-link> |
    <router-link to="/about">About</router-link>
    <router-view />
  </div>
</template>

<style>
.router-link-active {
  color: red;
}
</style>
2
3
4
5
6
7
8
9
10
11
12
13
# router-link 配置
to属性:是一个字符串,或者是一个对象
replace属性:设置 replace 属性的话,当点击时,会调用 router.replace(),而不是 router.push();
active-class属性:设置激活a元素后应用的class,默认是router-link-active
exact-active-class属性:嵌套路由,链接精准激活时,应用于渲染的
<a>的 class,默认是router-link-exact-active;
# router-link 和 router-view 的 v-slot 🔥
在vue-router3.x的时候,router-link有一个tag属性,可以决定router-link到底渲染成什么元素,但是在vue-router4.x开始,该属性被移除了;而给我们提供了更加具有灵活性的v-slot的方式来定制渲染的内容;
首先,我们需要使用 custom 表示我们整个元素要自定义;如果不写,那么自定义的内容会被包裹在一个 a 元素中;
其次,我们使用v-slot来作用域插槽来获取内部传给我们的值:
- href:解析后的 URL;
- route:解析后的规范化的route对象;
- navigate:触发导航的函数;
- isActive:是否匹配的状态;
- isExactActive:是否是精准匹配的状态;
router-view也提供给我们一个插槽,可以用于 <transition> 和 <keep-alive>组件来包裹你的路由组件:
- Component:要渲染的组件;
- route:解析出的标准化路由对象;
<template>
  <div>
    <!-- props: href 跳转的链接 -->
    <!-- props: route对象 -->
    <!-- props: navigate导航函数 -->
    <!-- props: isActive 是否当前处于活跃的状态 -->
    <!-- props: isExactActive 是否当前处于精确的活跃状态 -->
    <router-link to="/home" v-slot="props" custom>
      <button @click="props.navigate">{{ props.href }}</button>
      <button @click="props.navigate">哈哈哈</button>
      <span :class="{ active: props.isActive }">{{ props.isActive }}</span>
      <span :class="{ active: props.isExactActive }">{{
        props.isExactActive
      }}</span>
      <!-- <p>{{props.route}}</p> -->
    </router-link>
    <br />

    <router-view v-slot="props">
      <transition name="why">
        <keep-alive>
          <component :is="props.Component"></component>
        </keep-alive>
      </transition>
    </router-view>
    <!-- <router-view /> -->
  </div>
</template>

<script setup>

</script>

<style>
.router-link-active {
  color: red;
}

.why-enter-from,
.why-leave-to {
  opacity: 0;
}

.why-enter-active,
.why-leave-active {
  transition: opacity 1s ease;
}
</style>
2
3
4
5
6
7
8
9
10
11
12
13
14
15
16
17
18
19
20
21
22
23
24
25
26
27
28
29
30
31
32
33
34
35
36
37
38
39
40
41
42
43
44
45
46
47
48
# 路由懒加载 🔥
当打包构建应用时,JavaScript 包会变得非常大,影响页面加载:
- 如果我们能把不同路由对应的组件分割成不同的代码块,然后当路由被访问的时候才加载对应组件,会更加高效;
- 也可以提高首屏的渲染效率;
其实这里还是我们前面讲到过的webpack的分包知识,而Vue Router默认就支持动态来导入组件:
- 这是因为component可以传入一个组件,也可以接收一个函数,该函数 需要放回一个Promise;
- 而import函数就是返回一个Promise;
修改 /src/router/index.js
import { createRouter, createWebHistory } from 'vue-router'

const routes = [
  {
    path: '/',
    redirect: '/home',
  },
  {
    path: '/home',
    name: 'home', // 名称
    component: () =>
      // webpackChunkName 打包起名,必须这样写!webpack的功能
      import(/* webpackChunkName: 'home-chunk' */ '../views/Home.vue'), // 动态路由。import返回Promise
    // 元数据
    meta: {
      name: 'conanan',
    },
  },
  {
    path: '/about',
    name: 'about',
    component: () => import('../views/About.vue'),
  },
]

const router = createRouter({
  history: createWebHistory(),
  routes,
})

export default router
2
3
4
5
6
7
8
9
10
11
12
13
14
15
16
17
18
19
20
21
22
23
24
25
26
27
28
29
30
31
32
执行打包命令
npm run build
可以看出

# 动态路由 🔥
修改 /src/router/index.js
const routes = [
  {
    // 动态路由,必须完整匹配!如下'/'分割的4个参数一个不能少,也不能多
    path: '/user/:username/id/:id',
    name: 'user',
    component: () => import('../views/User.vue'),
  },
]
2
3
4
5
6
7
8
/src/App.vue
<template>
  <div>
    <router-link to="/user/conanan/id/10086">User</router-link>
    <router-view />
  </div>
</template>
2
3
4
5
6
/src/pages/User.vue
<template>
  <h2>User: {{ route.params.username }} - {{ route.params.id }}</h2>
</template>

<script setup>
import { useRouter, useRoute } from 'vue-router'

const router = useRouter()
console.log('router', router)

const route = useRoute()
const params = route.params
console.log('params', params)

const query = route.query
console.log('query', query)

// 这种方法获取到是 undefiend,很尴尬。不知道原因在哪
// import { getCurrentInstance } from 'vue'
// const { ctx } = getCurrentInstance()
// console.log(ctx.$router)
// console.log(ctx.$route)

// 在 options api 中直接调用如下:
// this.$route.params 即可
// this.$route.query 即可
// this.$router
</script>

<style lang="scss" scoped></style>
2
3
4
5
6
7
8
9
10
11
12
13
14
15
16
17
18
19
20
21
22
23
24
25
26
27
28
29
30
# NotFound 🔥
对于哪些没有匹配到的路由,我们通常会匹配到固定的某个页
修改 /src/router/index.js
const routes = [
  {
    path: '/:pathMatch(.*)',
    // path: '/:pathMatch(.*)*', // 多个*,会将path根据'/'分割转为数组
    component: () => import('../views/NotFound.vue'),
  },
]
2
3
4
5
6
7
/src/App.vue
<template>
  <div>
    <router-link to="/notfound/aa/bb/cc">NotFound</router-link> |
    <router-view />
  </div>
</template>
2
3
4
5
6
/src/pages/NotFound.vue
<template>
  <div>
    <h2>Page Not Found</h2>
    <p>您打开的路径页面不存在, 请不要使用我们家的应用程序了~</p>
    <h1>{{ route.params.pathMatch }}</h1>
  </div>
</template>

<script setup>
import { useRoute } from 'vue-router'
const route = useRoute()
</script>

<style scoped></style>
2
3
4
5
6
7
8
9
10
11
12
13
14
# 路由的嵌套 🔥
什么是路由的嵌套呢?
- 目前我们匹配的Home、About、User等都属于底层路由,我们在它们之间可以来回进行切换;
- 但是呢,我们Home页面本身,也可能会在多个组件之间来回切换:比如Home中包括Product、Message,它们可以在Home内部来回切换;
- 这个时候我们就需要使用嵌套路由,在Home中也使用 router-view 来占位之后需要渲染的组件
修改 /src/router/index.js
const routes = [
  {
    path: '/home',
    name: 'home', // 名称
    component: () =>
      // webpackChunkName 打包起名,必须这样写!webpack的功能
      import(/* webpackChunkName: 'home-chunk' */ '../views/Home.vue'), // 动态路由。import返回Promise
    // 元数据
    meta: {
      name: 'conanan',
    },
    children: [
      {
        // 这里path必须为空
        path: '',
        // 这里必须写全路径
        redirect: '/home/message',
      },
      {
        // 这里的path不用拼接父route的path,并且不可以已'/'开头!!!
        path: 'message',
        name: 'message',
        component: () => import('../views/HomeMessage.vue'),
      },
      {
        path: 'shops',
        name: 'shops',
        component: () => import('../views/HomeShops.vue'),
      },
    ],
  },
]
2
3
4
5
6
7
8
9
10
11
12
13
14
15
16
17
18
19
20
21
22
23
24
25
26
27
28
29
30
31
32
/src/Home.vue
<template>
  <div>
    <h2>Home</h2>

    <router-view />

    <router-link to="/home/message">消息</router-link> |
    <router-link to="/home/shops">商品</router-link> |
    <router-link to="/home/moment">动态</router-link>
  </div>
</template>

<script setup></script>

<style lang="scss" scoped></style>
2
3
4
5
6
7
8
9
10
11
12
13
14
15
其他组件略
# 代码路由 🔥
修改/src/App.vue
<template>
  <div>
    <router-link to="/home">Home</router-link> |
    <router-link to="/about">About</router-link> |
    <router-link to="/user/conanan/id/10086">User</router-link> |
    <router-link to="/notfound/aa/bb/cc">NotFound</router-link> |
    <button @click="jumpToAbout">查看我!</button>
    <button @click="back">←</button>
    <button @click="forword">→</button>
    <router-view />
  </div>
</template>

<script setup>
import { useRouter } from 'vue-router'
const router = useRouter()

const jumpToAbout = () => {
  router.push({
    path: '/about',
    query: {
      q1: 'qa1',
    },
  })
}

const forword = () => {
  router.go(1)
  // 其他方法就不介绍了
}

const back = () => {
  router.go(-1)
}
</script>

<style>
.router-link-active {
  color: red;
}
</style>
2
3
4
5
6
7
8
9
10
11
12
13
14
15
16
17
18
19
20
21
22
23
24
25
26
27
28
29
30
31
32
33
34
35
36
37
38
39
40
41
修改/src/pages/About.vue
<template>
  <div>
    <h2>About</h2>
    <div>{{ route.query.q1 }}</div>
  </div>
</template>

<script setup>
import { useRoute } from 'vue-router'
const route = useRoute()
</script>

<style lang="scss" scoped></style>
2
3
4
5
6
7
8
9
10
11
12
13
# 动态添加、删除路由—权限 🔥
# 添加路由
某些情况下我们可能需要动态的来添加路由:
- 比如根据用户不同的权限,注册不同的路由;
- 这个时候我们可以使用一个方法 addRoute;
如果我们是为route添加一个children路由,那么可以传入对应的name
修改 /src/router/index.js
const router = createRouter({
  history: createWebHistory(),
  routes,
})

// 动态添加路由
const categoryRoute = {
  path: '/category',
  component: () => import('../views/Category.vue'),
}

// 添加顶级路由对象
router.addRoute(categoryRoute)

// 添加二级路由对象,第一个参数为路由的名称name
router.addRoute('home', {
  path: 'moment',
  component: () => import('../views/HomeMoment.vue'),
})
2
3
4
5
6
7
8
9
10
11
12
13
14
15
16
17
18
19
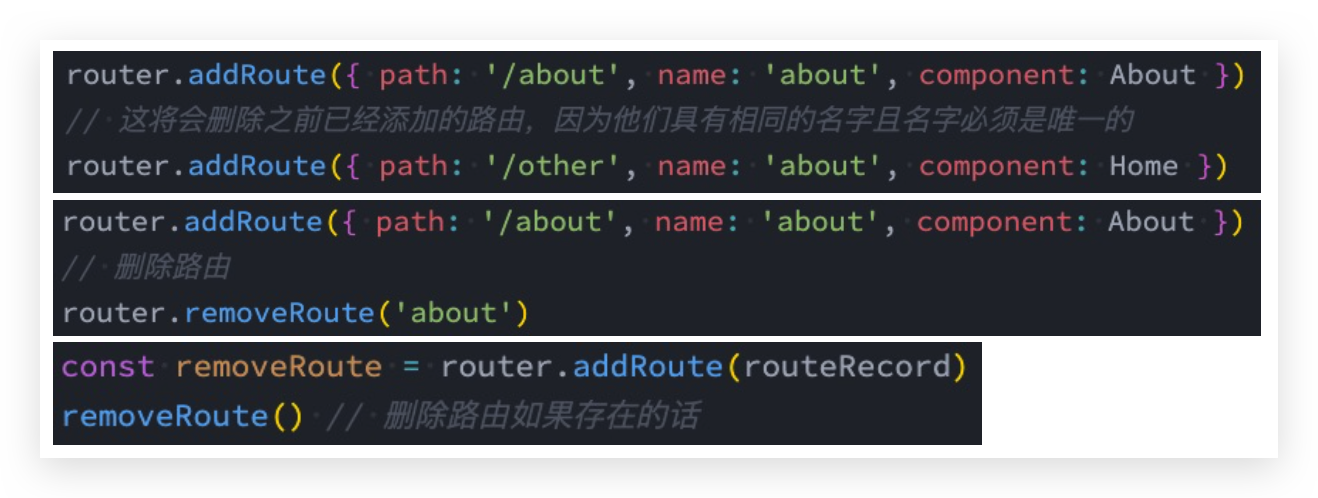
# 删除路由
不常用,删除路由有以下三种方式:
- 方式一:添加一个name相同的路由;
- 方式二:通过removeRoute方法,传入路由的名称;
- 方式三:通过addRoute方法的返回值回调;
# 其他方法
- router.hasRoute():检查路由是否存在。
- router.getRoutes():获取一个包含所有路由记录的数组
# 路由导航守卫—拦截 🔥
# 介绍
vue-router 提供的导航守卫主要用来通过跳转或取消的方式守卫导航。
全局的前置守卫beforeEach是在导航触发时会被回调的
它有两个参数:
- to:即将进入的路由Route对象;
- from:即将离开的路由Route对象;
它有返回值:
- false:取消当前导航;
- 不返回或者undefined:进行默认导航;
- 返回一个路由地址:
- 可以是一个string类型的路径;
- 可以是一个对象,对象中包含path、query、params等信息;
可选的第三个参数:next
- 在Vue2中我们是通过next函数来决定如何进行跳转的;
- 但是在Vue3中我们是通过返回值来控制的,不再推荐使用next函数,这是因为开发中很容易调用多次next;
修改 /src/router/index.js
// 导航守卫beforeEach
let counter = 0
// to: Route对象, 即将跳转到的Route对象
// from: Route对象,
/**
 * 返回值问题:
 *    1.false: 不进行导航
 *    2.undefined或者不写返回值: 进行默认导航
 *    3.字符串: 路径, 跳转到对应的路径中
 *    4.对象: 类似于 router.push({path: "/login", query: ....})
 */
router.beforeEach((to, from) => {
  console.log(`进行了${++counter}路由跳转`)
  // if (to.path.indexOf("/home") !== -1) {
  //   return "/login"
  // }
  if (to.path !== '/login') {
    const token = window.localStorage.getItem('token')
    if (!token) {
      return '/login'
    }
  }
})
2
3
4
5
6
7
8
9
10
11
12
13
14
15
16
17
18
19
20
21
22
23
# 登录守卫功能
/src/Login.vue
<template>
  <div>
    <button @click="loginClick">登录</button>
  </div>
</template>

<script setup>
import { useRouter } from 'vue-router'

const router = useRouter()

const loginClick = () => {
  window.localStorage.setItem('token', 'why')

  router.push({
    path: '/home',
  })
}
</script>

<style scoped></style>
2
3
4
5
6
7
8
9
10
11
12
13
14
15
16
17
18
19
20
21
注册路由
{
  path: '/login',
  component: () => import('../views/Login.vue'),
},
2
3
4
修改 /src/router/index.js
// 导航守卫beforeEach
router.beforeEach((to, from) => {
  if (to.path !== '/login') {
    const token = window.localStorage.getItem('token')
    if (!token) {
      return '/login'
    }
  }
})
2
3
4
5
6
7
8
9
# 其他导航守卫
Vue还提供了很多的其他守卫函数 (opens new window),目的都是在某一个时刻给予我们回调,让我们可以更好的控制程序的流程或者功能
完整的导航解析流程:
- 导航被触发。
- 在失活的组件里调用 beforeRouteLeave 守卫。
- 调用全局的 beforeEach 守卫。
- 在重用的组件里调用 beforeRouteUpdate 守卫(2.2+)。
- 在路由配置里调用 beforeEnter。
- 解析异步路由组件。
- 在被激活的组件里调用 beforeRouteEnter。
- 调用全局的 beforeResolve 守卫(2.5+)。
- 导航被确认。
- 调用全局的 afterEach 钩子。
- 触发 DOM 更新。
- 调用 beforeRouteEnter 守卫中传给 next 的回调函数,创建好的组件实例会作为回调函数的参数传入。