 Webpack-1 入门
# 入门
配套的代码在 Github 中。
可查看中文文档 (opens new window),官方文档 (opens new window)。注意两者区别。
# 概念
# 简介
本质上,webpack 是一个用于现代 JavaScript 应用程序的静态模块打包工具。当 webpack 处理应用程序时,它会在内部构建一个 依赖图(dependency graph) (opens new window),此依赖图对应映射到项目所需的每个模块,并生成一个或多个 bundle。
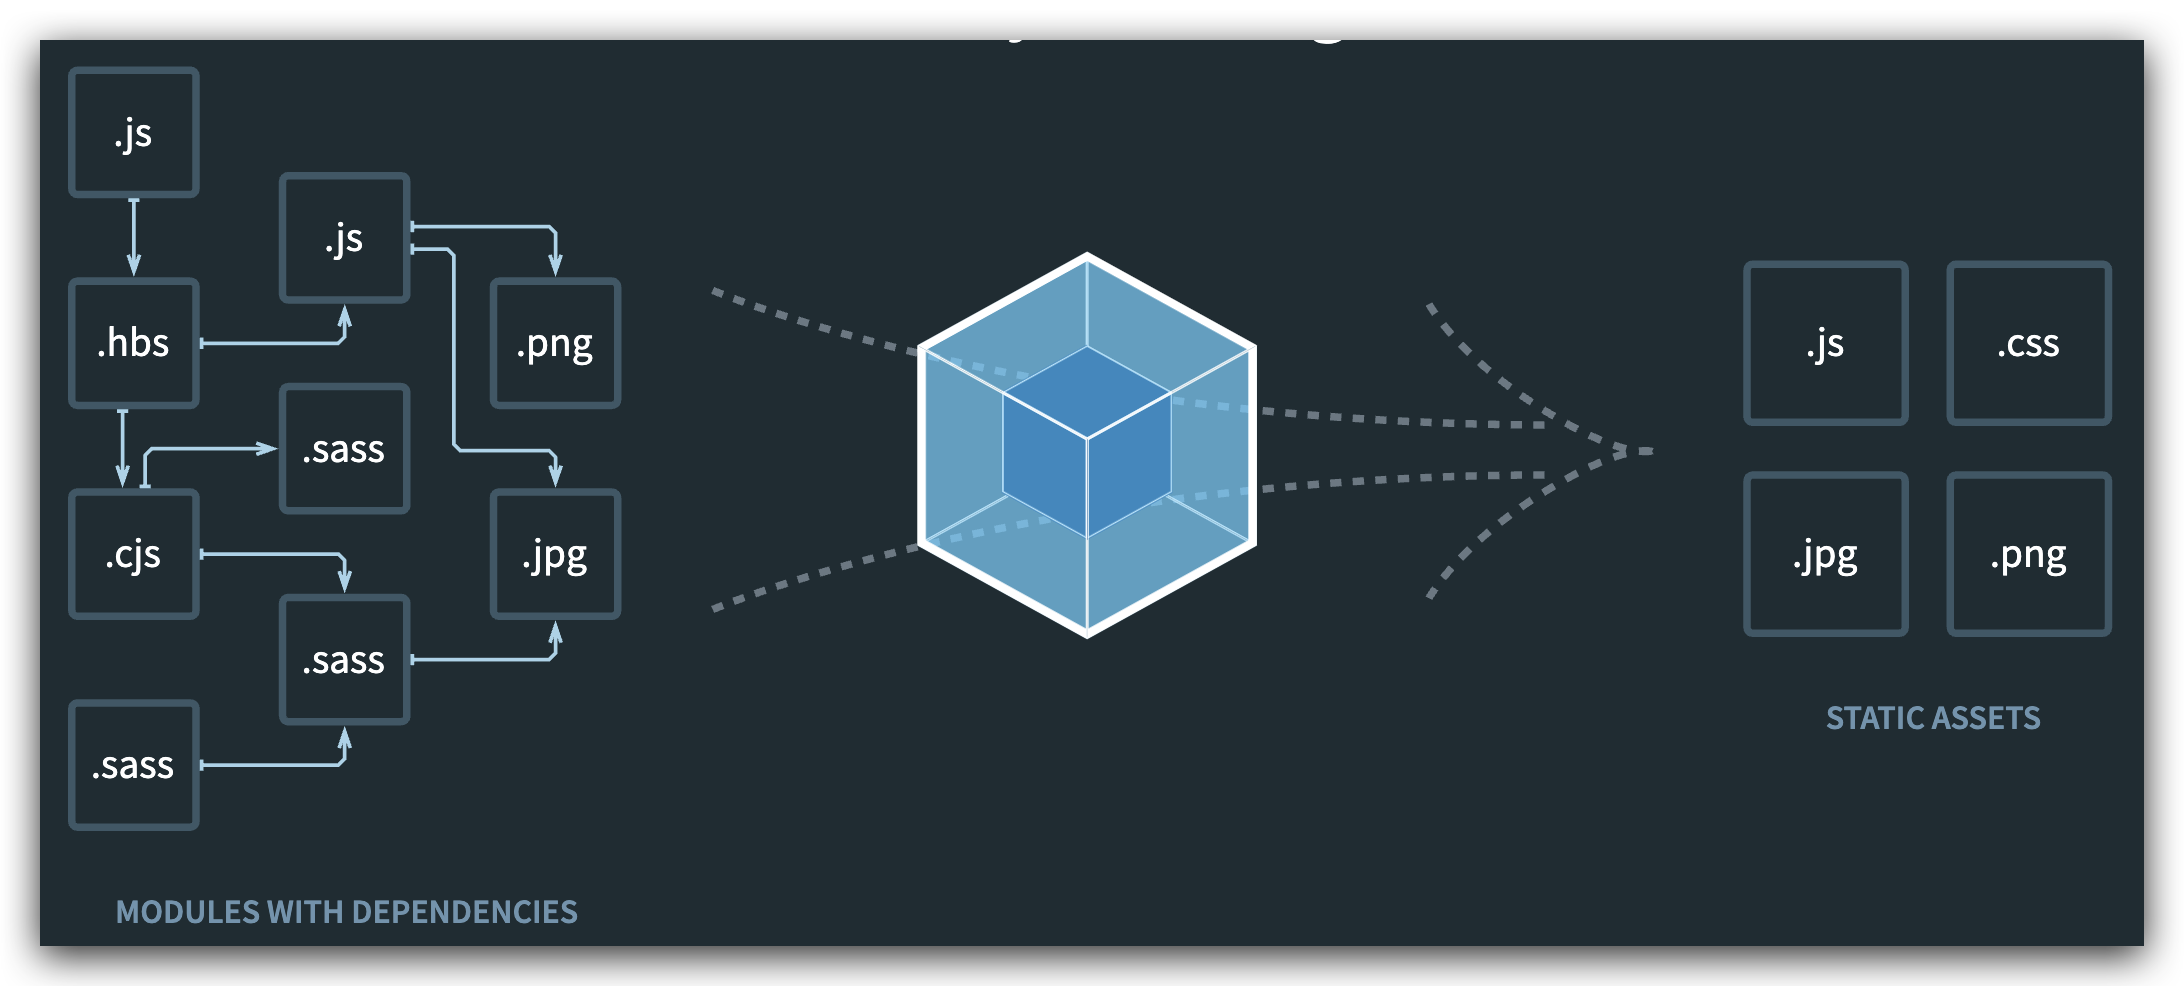
静态模块 + 打包
- 在 ES6 之前,进行模块化开发时必须借助其他工具,如 CommonJS。通过模块化开发完项目后,还需处理模块间的依赖
- 将各模块进行打包整合,处理为大部分浏览器能识别的代码、资源
# 优缺点
# 优点
模块化开发
程序员在开发时可以分模块创建不同的 js、 css 等小文件方便开发,最后使用 webpack 将这些小文件打包成一个文件,减少了 http 的请求次数。webpack 可以实现按需打包,为了避免出现打包文件过大可以打包成多个文件。
编译 typescript、ES6 等高级 js 语法
CSS 预编译
webpack 允许在开发中使用 Sass 和 Less 等原生 CSS 的扩展技术,通过 sass-loader、less-loader 将 Sass 和 Less 的语法编译成浏览器可识别的 CSS 语法。
# 缺点
- 配置有些繁琐,文档不丰富
# 和 grunt / gulp 对比
- grunt / gulp 核心为 Task,主要用于简单的合并、压缩。更强调前端流程的自动化、模块化不是它的核心
- Webpack 更加强调模块化开发管理,文件合并、压缩、预处理是附带功能
# 安装
Webpack 依赖 Node,Node 会自动安装 npm。一般推荐先对项目进行npn init或npm install
# 局部安装
在 package.json 中定义 scripts 中的 webpack 命令,首先查找使用的是局部安装的 webpack,在 node_modules/bin 中。命令行中也是先查找项目中的 webpack。类比 DNS
cd 目录
# --save-dev 是开发时依赖,项目打包后不需要继续使用
npm install --save-dev webpack
# 或指定版本
npm install --save-dev webpack@<version>

# 安装后查看版本号,需要找到安装的目录,如 node_modules/webpack/bin,进入后
./webpack.js -v
2
3
4
5
6
7
8
npm install --save-dev webpack@3.7.0 #本地安装 Webpack 3.6.0,因为 vue cli2 依赖该版本。此处改为3.7.0是为了区分
# 全局安装
一般不推荐,但是在使用命令学习时每个文件夹都要局部安装的话太麻烦了
全局安装之后在终端执行 webpack 命令,就使用的是全局安装的 webpack 。注意:4.0 以后的版本需要安装 webpack-cl。
本地安装只需去掉-g,即可在当前目录安装
npm install webpack -g
# 4.0后的版本需要安装 webpack-cl
npm install webpack-cli -g
# 可以指定版本
npm install webpack@<version> -g #全局安装 Webpack 3.6.0,因为 vue cli2 依赖该版本。


# 安装后查看版本号
webpack -v
2
3
4
5
6
7
8
9
npm install webpack@3.6.0 -g #全局安装 Webpack 3.6.0,因为 vue cli2 依赖该版本。
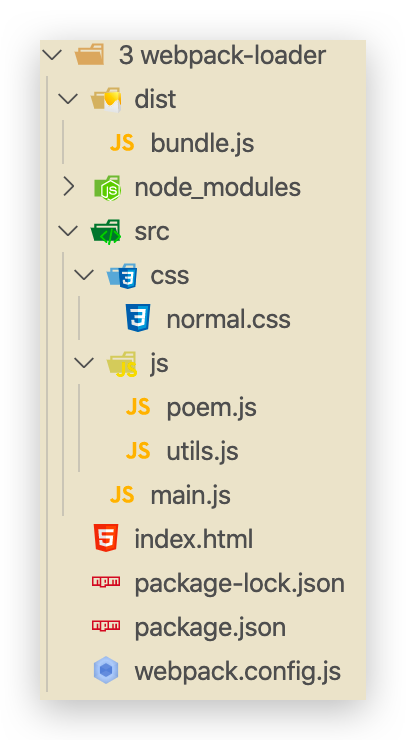
# 基本使用—打包 JS
目前的项目文件结构

<!DOCTYPE html>
<html lang="en">
  <head>
    <meta charset="UTF-8" />
    <meta name="viewport" content="width=device-width, initial-scale=1.0" />
    <title>Document</title>
  </head>
  <body>
    <!-- 引用的是打包后的文件。无需写type -->
    <script src="./dist/bundle.js"></script>
  </body>
</html>
2
3
4
5
6
7
8
9
10
11
12
// main.js

// CommonJS
var { formatDate } = require('./js/utils.js')

console.log(formatDate(new Date()))

// ES6
import * as poem from './js/poem.js'
console.log(poem.SPRING)
2
3
4
5
6
7
8
9
10
// ./js/utils.js

function formatDate(date) {
  return `${date.getFullYear()}-${
    date.getMonth() + 1 < 10 ? '0' + (date.getMonth() + 1) : date.getMonth() + 1
  }-${date.getDate() < 10 ? '0' + date.getDate() : date.getDate()} ${
    date.getHours() < 10 ? '0' + date.getHours() : date.getHours()
  }:${date.getMinutes() < 10 ? '0' + date.getMinutes() : date.getMinutes()}:${
    date.getSeconds() < 10 ? '0' + date.getSeconds() : date.getSeconds()
  }`
}

// CommonJS
// 可以省略掉 module
module.exports = {
  formatDate,
}
2
3
4
5
6
7
8
9
10
11
12
13
14
15
16
17
// ./js/poem.js

const SPRING =
  '天街小雨润如酥,草色遥看近却无。最是一年春好处,绝胜烟柳满皇都。'
const SUMMER =
  '毕竟西湖六月中,风光不与四时同。接天莲叶无穷碧,映日荷花别样红。'
const AUTUMN =
  '银烛秋光冷画屏,轻罗小扇扑流萤。天阶夜色凉如水,坐看牵牛织女星。'
const WINTER = '日暮苍山远,天寒白屋贫。柴门闻犬吠,风雪夜归人。'

// ES6
export { SPRING, SUMMER, AUTUMN, WINTER }
2
3
4
5
6
7
8
9
10
11
12
执行打包命令
cd study-webpack/1 webpack起步
# 使用全局 webpack 打包
webpack ./src/main.js ./dist/bundle.js

##########
Hash: f664968929cb925ac098
Version: webpack 3.6.0
Time: 35ms
    Asset     Size  Chunks             Chunk Names
bundle.js  4.16 kB       0  [emitted]  main
   [0] /Users/conanan/Documents/VSCode/study-webpack/1 webpack起步/src/main.js 144 bytes {0} [built]
   [1] /Users/conanan/Documents/VSCode/study-webpack/1 webpack起步/src/utils.js 504 bytes {0} [built]
   [2] /Users/conanan/Documents/VSCode/study-webpack/1 webpack起步/src/poem.js 486 bytes {0} [built]
2
3
4
5
6
7
8
9
10
11
12
13
cd study-webpack/1 webpack起步
#使用本地 webpack 打包
./node_modules/.bin/webpack ./src/main.js ./dist/bundle.js

##########
Hash: bf83695e4e6f3e90f28b
Version: webpack 3.7.0
Time: 35ms
    Asset    Size  Chunks             Chunk Names
bundle.js  4.2 kB       0  [emitted]  main
   [0] ./src/main.js 163 bytes {0} [built]
   [1] ./src/utils.js 516 bytes {0} [built]
   [2] ./src/poem.js 493 bytes {0} [built]
2
3
4
5
6
7
8
9
10
11
12
13
虽然仅仅打包了 main.js,但是 webpack 会将 main.js 所依赖的所有 js 文件都打包,且无论是 ES6 的模块化还是 CommonJS 的模块化都可以正确打包
# 配置—webpack.config.js
做到的结果是仅需执行webpack命令或npm run build命令即可做出上述复杂命令的操作
首先生成package.json,在执行npm init时指定 name(最好全英文)、入口文件main.js(不指定也没有报错?)
在 src 和 dist 同级目录下创建webpack.config.js
// 这个会从 node 中查找,需要 npm init 来生成 package.json。这里好像不能使用 ES6 的模块化语法
const path = require('path')

module.exports = {
  entry: './src/main.js',
  output: {
    // path 需要写绝对路径,但又不能直接指定,可以动态获取(采用 node 语法)
    path: path.resolve(__dirname, 'dist'),
    filename: 'bundle.js',
  },
}
2
3
4
5
6
7
8
9
10
11
执行命令
cd study-webpack/2 webpack配置
# 默认先查找局部安装的 webpack
webpack

##########
Hash: bf83695e4e6f3e90f28b
Version: webpack 3.7.0
Time: 37ms
    Asset    Size  Chunks             Chunk Names
bundle.js  4.2 kB       0  [emitted]  main
   [0] ./src/main.js 163 bytes {0} [built]
   [1] ./src/utils.js 516 bytes {0} [built]
   [2] ./src/poem.js 493 bytes {0} [built]
2
3
4
5
6
7
8
9
10
11
12
13
如何配置执行npm run build即可完成上述操作呢?需要修改package.json
{
  "name": "meetwebpack",
  "version": "1.0.0",
  "description": "",
  "main": "main.js",
  "scripts": {
    "test": "echo \"Error: no test specified\" && exit 1",
    "build": "webpack"
  },
  "author": "",
  "license": "ISC"
}
2
3
4
5
6
7
8
9
10
11
12
执行命令
cd study-webpack/2 webpack配置
npm run build

##########
> meetwebpack@1.0.0 build /Users/conanan/Documents/VSCode/study-webpack/2 webpack配置
> webpack

Hash: bf83695e4e6f3e90f28b
Version: webpack 3.7.0
Time: 35ms
    Asset    Size  Chunks             Chunk Names
bundle.js  4.2 kB       0  [emitted]  main
   [0] ./src/main.js 163 bytes {0} [built]
   [1] ./src/utils.js 516 bytes {0} [built]
   [2] ./src/poem.js 493 bytes {0} [built]
2
3
4
5
6
7
8
9
10
11
12
13
14
15
# loader 🔥
webpack 只能理解 JavaScript 和 JSON 文件,这是 webpack 开箱可用的自带能力。loader 让 webpack 能够去处理其他类型的文件,并将它们转换为有效 模块 (opens new window),以供应用程序使用,以及被添加到依赖图中。
Loader 可以理解为是模块和资源的转换器,它本身是一个函数,接受源文件作为参数,返回转换的结果。这样,我们就可以通过 require 来加载任何类型的模块或文件,比如 CoffeeScript、 JSX、 LESS 或图片。首先我们需要安装相关 Loader 插件,具体操作文档中写得非常详细。
# 打包 CSS
css-loader 是将 css 装载到 javascript;style-loader 是让 javascript 认识 css。
目前的项目文件结构
安装 css-loader 和 style-loader
npm install --save-dev css-loader style-loader1修改 webpack.config.js,添加 module 模块
// 这个会从 node 中查找,需要 npm init 来生成 package.json
const path = require('path')

module.exports = {
  entry: './src/main.js',
  output: {
    // path 需要写绝对路径,但又不能直接指定,可以动态获取(采用 node 语法)
    path: path.resolve(__dirname, 'dist'),
    filename: 'bundle.js',
  },
  module: {
    rules: [
      {
        test: /\.css$/i,
        // css-loader解析css文件后,使用import加载,并返回css代码
        // style-loader 将模块导出作为style添加到DOM中
        // 使用多个loader时,从右到左加载。顺序不能乱!
        use: ['style-loader', 'css-loader'],
      },
    ],
  },
}
1
2
3
4
5
6
7
8
9
10
11
12
13
14
15
16
17
18
19
20
21
22创建 css 文件
/* css/normal.css */

body {
  background-color: skyblue;
}
1
2
3
4
5修改入口 main.js ,引入上面的 css 文件(若没有 loader,直接引入打包则报错)
// CommonJS
var { formatDate } = require('./js/utils.js')

console.log(formatDate(new Date()))

// ES6
import * as poem from './js/poem.js'
console.log(poem.SPRING)

// CommonJS 语法,不能使用 ES6,那是针对 JS 的
require('./css/normal.css')
1
2
3
4
5
6
7
8
9
10
11重新打包
webpack或npn run build访问 index.html 看看背景
# 打包 less、scss、stylus
这里以 less 为例,创建文件并放入 css 目录中,引入等操作和 css 文件一样
安装 less-loader(由于 webpack 的版本较低,是 3.6.0 或 3.7.0,目前已经出了 5.0 了,这里 less-loader 版本也需要降低)
npm install --save-dev less-loader less1卸载高版本 less-loader,重新安装指定版本的(我也是服了,没找到哪写了版本高)
npm uninstall less-loader
npm install less-loader@4.1.0 --save-dev
1
2修改 webpack.config.js,添加 module 模块
// 这个会从 node 中查找,需要 npm init 来生成 package.json
const path = require('path')

module.exports = {
  entry: './src/main.js',
  output: {
    // path 需要写绝对路径,但又不能直接指定,可以动态获取(采用 node 语法)
    path: path.resolve(__dirname, 'dist'),
    filename: 'bundle.js',
  },
  module: {
    rules: [
      {
        // 匹配.css文件
        test: /\.css$/i,

        // style-loader 将模块导出作为style添加到DOM中
        // css-loader解析css文件后,使用import加载,并返回css代码
        // 使用多个loader时,从右到左加载。顺序不能乱!
        use: ['style-loader', 'css-loader'],
      },
      {
        test: /\.less$/,
        use: [
          {
            loader: 'style-loader', // creates style nodes from JS strings
          },
          {
            loader: 'css-loader', // translates CSS into CommonJS
          },
          {
            loader: 'less-loader', // compiles Less to CSS
          },
        ],
      },
    ],
  },
}
1
2
3
4
5
6
7
8
9
10
11
12
13
14
15
16
17
18
19
20
21
22
23
24
25
26
27
28
29
30
31
32
33
34
35
36
37
38创建 less 文件,并在入口文件 main.js 中引入
// css/special.less

@fontSize: 50px;
@fontColor: orange;

body {
  font-size: @fontSize;
  color: @fontColor;
}
1
2
3
4
5
6
7
8
9// main.js // CommonJS var { formatDate } = require('./js/utils.js') console.log(formatDate(new Date())) // ES6 import * as poem from './js/poem.js' console.log(poem.SPRING) // CommonJS 语法,不能使用 ES6,那是针对 JS 的 require('./css/normal.css') require('./css/special.less') document.writeln('World')1
2
3
4
5
6
7
8
9
10
11
12
13
14
15HTML 文件
<!DOCTYPE html> <html lang="en"> <head> <meta charset="UTF-8" /> <meta name="viewport" content="width=device-width, initial-scale=1.0" /> <title>Document</title> </head> <body> <p>Hello</p> <!-- 引用的是打包后的文件。无需写type --> <script src="./dist/bundle.js"></script> </body> </html>1
2
3
4
5
6
7
8
9
10
11
12
13重新打包
webpack或npn run build访问 index.html 看看字体及颜色
# 打包图片
安装 url-loader,file-loader(当图片大小大于 limit 时使用)
npm install --save-dev url-loader npm install --save-dev file-loader1
2修改 webpack.config.js,添加 module 模块
// 这个会从 node 中查找,需要 npm init 来生成 package.json const path = require('path') module.exports = { entry: './src/main.js', output: { // path 需要写绝对路径,但又不能直接指定,可以动态获取(采用 node 语法) path: path.resolve(__dirname, 'dist'), filename: 'bundle.js', // 输出涉及url时,会自动在前面添加该字符串。实际中,会把所有文件都打包到 dist 中,此时应该删掉publicPath配置 publicPath: 'dist/', }, module: { rules: [ { // 匹配.css文件 test: /\.css$/i, // style-loader 将模块导出作为style添加到DOM中 // css-loader解析css文件后,使用import加载,并返回css代码 // 使用多个loader时,从右到左加载。顺序不能乱! use: ['style-loader', 'css-loader'], }, { test: /\.less$/, use: [ { loader: 'style-loader', // creates style nodes from JS strings }, { loader: 'css-loader', // translates CSS into CommonJS }, { loader: 'less-loader', // compiles Less to CSS }, ], }, { test: /\.(png|jpg|gif|jpeg)$/, use: [ { loader: 'url-loader', options: { // 当图片大小小于 limit 时,会被编译为base64字符串 // 当大于 limit 时,会使用 file-loader 进行加载,仅需要安装! limit: 10000, // img/目录下,[name]为原名,[hash:8]为8位哈希值,.[ext]为后缀 name: 'img/[name][hash:8].[ext]', }, }, ], }, ], }, }1
2
3
4
5
6
7
8
9
10
11
12
13
14
15
16
17
18
19
20
21
22
23
24
25
26
27
28
29
30
31
32
33
34
35
36
37
38
39
40
41
42
43
44
45
46
47
48
49
50
51
52
53
54
55修改 css 中背景
body { /* background-color: skyblue; */ background-image: url('../img/conan.jpeg'); }1
2
3
4重新打包
webpack或npn run build访问 index.html 看看背景图片
当图片大小小于 limit 时,会被编译为 base64 字符串,可以直接显示出来
当大于 limit 时,会使用 file-loader 进行加载,且重命名(32 位哈希值)并打包到 dist 目录中,由于路径不对无法显示(显示的是以 index.html 的目录为目录的路径,需要改为以 dist/ 为目录的路径)。
实际中,这种 32 位哈希值的文件名并不方便,且没有放入统一的目录中。实际可能会将其放入
img/[name][hash:8].[ext],在 loader 中配置即可但是实际中,会把所有文件都打包到 dist 中,此时应该删掉 publicPath 配置!
# babel
webpack 打包的 JS 文件,没有将 ES6 转为 ES5,有部分浏览器不支持,所以此时可以使用 babel
安装 babel-loader 和 babel(注意此处还是根据 webpack 3.6.* 选择的版本)
npm install babel-loader@7 babel-core babel-preset-es2015 --save-dev1我就服了,文档里的配置还让安装 webpack?还失败了,还有些看不懂的配置。算了 😄
修改 webpack.config.js,添加 module 模块
// 这个会从 node 中查找,需要 npm init 来生成 package.json const path = require('path') module.exports = { entry: './src/main.js', output: { // path 需要写绝对路径,但又不能直接指定,可以动态获取(采用 node 语法) path: path.resolve(__dirname, 'dist'), filename: 'bundle.js', // 输出涉及url时,会自动在前面添加该字符串。实际中,会把所有文件都打包到 dist 中,此时应该删掉publicPath配置 publicPath: 'dist/', }, module: { rules: [ { // 匹配.css文件 test: /\.css$/i, // style-loader 将模块导出作为style添加到DOM中 // css-loader解析css文件后,使用import加载,并返回css代码 // 使用多个loader时,从右到左加载。顺序不能乱! use: ['style-loader', 'css-loader'], }, { test: /\.less$/, use: [ { loader: 'style-loader', // creates style nodes from JS strings }, { loader: 'css-loader', // translates CSS into CommonJS }, { loader: 'less-loader', // compiles Less to CSS }, ], }, { test: /\.(png|jpg|gif|jpeg)$/, use: [ { loader: 'url-loader', options: { // 当图片大小小于 limit 时,会被编译为base64字符串 // 当大于 limit 时,会使用 file-loader 进行加载,仅需要安装! limit: 10000, // img/目录下,[name]为原名,[hash:8]为8位哈希值,.[ext]为后缀 name: 'img/[name][hash:8].[ext]', }, }, ], }, { test: /\.js$/, // 排除 exclude: /(node_modules|bower_components)/, use: { loader: 'babel-loader', options: { presets: ['es2015'], }, }, }, ], }, }1
2
3
4
5
6
7
8
9
10
11
12
13
14
15
16
17
18
19
20
21
22
23
24
25
26
27
28
29
30
31
32
33
34
35
36
37
38
39
40
41
42
43
44
45
46
47
48
49
50
51
52
53
54
55
56
57
58
59
60
61
62
63
64
65
66重新打包
webpack或npn run build。查看 buldle.js 文件
# Vue—配合 webpack 使用 🔥
# 配置
npm 安装 vue
npm install vue --save1--save可以简写为-S,vue 是要在发布时也使用的,所以无需添加-dev使用 vue 开发,在 main.js 中
// CommonJS var { formatDate } = require('./js/utils.js') console.log(formatDate(new Date())) // ES6 import * as poem from './js/poem.js' console.log(poem.SPRING) // CommonJS 语法,不能使用 ES6,那是针对 JS 的 require('./css/normal.css') require('./css/special.less') document.writeln('World') import Vue from 'vue' const vm = new Vue({ el: '#app', data: { message: 'Hello', }, })1
2
3
4
5
6
7
8
9
10
11
12
13
14
15
16
17
18
19
20
21
22修改 index.html
<!DOCTYPE html> <html lang="en"> <head> <meta charset="UTF-8" /> <meta name="viewport" content="width=device-width, initial-scale=1.0" /> <title>Document</title> </head> <body> <div id="app"> {{message}} </div> <!-- 引用的是打包后的文件。无需写type --> <script src="./dist/bundle.js"></script> </body> </html>1
2
3
4
5
6
7
8
9
10
11
12
13
14
15重新打包
webpack或npn run build。访问后发现报错bundle.js:1344 [Vue warn]: You are using the runtime-only build of Vue where the template compiler is not available. Either pre-compile the templates into render functions, or use the compiler-included build.1这是由于 vue 在构建时有两个版本
- runtime-only:代码中,不可以有任何 template,如 id="app" 那个 div
- runtime-compiler:代码中,可以有 template,compiler 会对其进行编译
官网文档解释 (opens new window),修改 webpack.config.js
// 这个会从 node 中查找,需要 npm init 来生成 package.json const path = require('path') module.exports = { entry: './src/main.js', output: { // path 需要写绝对路径,但又不能直接指定,可以动态获取(采用 node 语法) path: path.resolve(__dirname, 'dist'), filename: 'bundle.js', // 输出涉及url时,会自动在前面添加该字符串。实际中,会把所有文件都打包到 dist 中,此时应该删掉publicPath配置 publicPath: 'dist/', }, module: { rules: [ { // 匹配.css文件 test: /\.css$/i, // style-loader 将模块导出作为style添加到DOM中 // css-loader解析css文件后,使用import加载,并返回css代码 // 使用多个loader时,从右到左加载。顺序不能乱! use: ['style-loader', 'css-loader'], }, { test: /\.less$/, use: [ { loader: 'style-loader', // creates style nodes from JS strings }, { loader: 'css-loader', // translates CSS into CommonJS }, { loader: 'less-loader', // compiles Less to CSS }, ], }, { test: /\.(png|jpg|gif|jpeg)$/, use: [ { loader: 'url-loader', options: { // 当图片大小小于 limit 时,会被编译为base64字符串 // 当大于 limit 时,会使用 file-loader 进行加载,仅需要安装! limit: 10000, // img/目录下,[name]为原名,[hash:8]为8位哈希值,.[ext]为后缀 name: 'img/[name][hash:8].[ext]', }, }, ], }, { test: /\.js$/, // 排除 exclude: /(node_modules|bower_components)/, use: { loader: 'babel-loader', options: { presets: ['es2015'], }, }, }, ], }, resolve: { alias: { // 指定发布的版本 vue$: 'vue/dist/vue.esm.js', // 用 webpack 1 时需用 'vue/dist/vue.common.js' }, }, }1
2
3
4
5
6
7
8
9
10
11
12
13
14
15
16
17
18
19
20
21
22
23
24
25
26
27
28
29
30
31
32
33
34
35
36
37
38
39
40
41
42
43
44
45
46
47
48
49
50
51
52
53
54
55
56
57
58
59
60
61
62
63
64
65
66
67
68
69
70
71
72重新打包
webpack或npn run build。访问
# el 和 template 区别
实际使用时,不会修改 index.html 的代码,仅仅留个 id="app" 的 div,只需要在使用 vue 时指定 template 即可,vue 内部会自动将 template 中的代码替换 id="app" 的 div(该 div 将不见)
<!DOCTYPE html>
<html lang="en">
<head>
<meta charset="UTF-8" />
<meta name="viewport" content="width=device-width, initial-scale=1.0" />
<title>Document</title>
</head>
<body>
<div id="app"></div>
<!-- 引用的是打包后的文件。无需写type -->
<script src="./dist/bundle.js"></script>
</body>
</html>
2
3
4
5
6
7
8
9
10
11
12
13
// main.js

// CommonJS
var { formatDate } = require('./js/utils.js')

console.log(formatDate(new Date()))

// ES6
import * as poem from './js/poem.js'
console.log(poem.SPRING)

// CommonJS 语法,不能使用 ES6,那是针对 JS 的
require('./css/normal.css')
require('./css/special.less')
document.writeln('World')
import Vue from 'vue'
const vm = new Vue({
el: '#app',
template: `
<div>
<h2>{{message}}</h2>
<button @click="btnClick">按钮</button>
</div>
`,
data: {
message: 'Hello',
},
methods: {
btnClick() {
alert(1)
},
},
})
2
3
4
5
6
7
8
9
10
11
12
13
14
15
16
17
18
19
20
21
22
23
24
25
26
27
28
29
30
31
32
33
34
35
# 终极使用
这个视频 (opens new window)讲解的非常详细,一步一步
<!DOCTYPE html>
<html lang="en">
  <head>
    <meta charset="UTF-8" />
    <meta name="viewport" content="width=device-width, initial-scale=1.0" />
    <title>Document</title>
  </head>
  <body>
    <div id="app"></div>
    <!-- 引用的是打包后的文件。无需写type -->
    <script src="./dist/bundle.js"></script>
  </body>
</html>
2
3
4
5
6
7
8
9
10
11
12
13
// CommonJS
var { formatDate } = require('./js/utils.js')

console.log(formatDate(new Date()))

// ES6
import * as poem from './js/poem.js'
console.log(poem.SPRING)

// CommonJS 语法,不能使用 ES6,那是针对 JS 的
require('./css/normal.css')
require('./css/special.less')
// document.writeln("World");

import Vue from 'vue'
// 导入组件 js 文件,可省略后缀
// import App from "./vue/app";
// 导入组件 vue 文件,不可省略后缀。在 vue 文件中可以省略(但需webpack配置)
import App from './vue/App.vue'

const vm = new Vue({
  el: '#app',
  template: '<App/>',
  components: {
    App,
  },
})
2
3
4
5
6
7
8
9
10
11
12
13
14
15
16
17
18
19
20
21
22
23
24
25
26
27
<!-- vue/App.vue-->
<template>
  <div>
    <h2>{{ message }}</h2>
    <button @click="btnClick">按钮</button>
    <cpn />
  </div>
</template>

<script>
// 可省略后缀(需在 webpakc 中配置)
import Cpn from './Cpn'

export default {
  name: 'App',
  components: {
    Cpn,
  },
  data() {
    return { message: 'Hello' }
  },
  methods: {
    btnClick() {
      alert(1)
    },
  },
}
</script>

<style></style>
2
3
4
5
6
7
8
9
10
11
12
13
14
15
16
17
18
19
20
21
22
23
24
25
26
27
28
29
30
<!-- vue/Cpn.vue-->
<template>
  <div>
    <h2>{{ message }}</h2>
  </div>
</template>

<script>
export default {
  name: 'Cpn',
  data() {
    return {
      message: 'Cpn 组件!!!!!',
    }
  },
}
</script>

<style></style>
2
3
4
5
6
7
8
9
10
11
12
13
14
15
16
17
18
19
若修改后重新打包失败,可以安装 Vue Loader (opens new window)。其中 vue-template-compiler 用于直接解析 template 模版(提高性能)
npm install -D vue-loader vue-template-compiler
webpack.config.js
// 这个会从 node 中查找,需要 npm init 来生成 package.json
const path = require('path')
const VueLoaderPlugin = require('vue-loader/lib/plugin')

module.exports = {
  entry: './src/main.js',
  output: {
    // path 需要写绝对路径,但又不能直接指定,可以动态获取(采用 node 语法)
    path: path.resolve(__dirname, 'dist'),
    filename: 'bundle.js',
    // 输出涉及url时,会自动在前面添加该字符串。实际中,会把所有文件都打包到 dist 中,此时应该删掉publicPath配置
    publicPath: 'dist/',
  },
  module: {
    rules: [
      {
        // 匹配.css文件
        test: /\.css$/i,

        // style-loader 将模块导出作为style添加到DOM中
        // css-loader解析css文件后,使用import加载,并返回css代码
        // 使用多个loader时,从右到左加载。顺序不能乱!
        use: ['style-loader', 'css-loader'],
      },
      {
        test: /\.less$/,
        use: [
          {
            loader: 'style-loader', // creates style nodes from JS strings
          },
          {
            loader: 'css-loader', // translates CSS into CommonJS
          },
          {
            loader: 'less-loader', // compiles Less to CSS
          },
        ],
      },
      {
        test: /\.(png|jpg|gif|jpeg)$/,
        use: [
          {
            loader: 'url-loader',
            options: {
              // 当图片大小小于 limit 时,会被编译为base64字符串
              // 当大于 limit 时,会使用 file-loader 进行加载,仅需要安装!
              limit: 10000,
              // img/目录下,[name]为原名,[hash:8]为8位哈希值,.[ext]为后缀
              name: 'img/[name][hash:8].[ext]',
            },
          },
        ],
      },
      {
        test: /\.js$/,
        // 排除
        exclude: /(node_modules|bower_components)/,
        use: {
          loader: 'babel-loader',
          options: {
            presets: ['es2015'],
          },
        },
      },
      {
        test: /\.vue$/,
        loader: 'vue-loader',
      },
    ],
  },
  resolve: {
    // 在 .vue 文件中导入如下文件时可以省略后缀
    extensions: ['.js', '.vue', '.css'],
    alias: {
      // 指定发布的版本
      vue$: 'vue/dist/vue.esm.js', // 用 webpack 1 时需用 'vue/dist/vue.common.js'
    },
  },
  plugins: [
    // 请确保引入这个插件!
    new VueLoaderPlugin(),
  ],
}
2
3
4
5
6
7
8
9
10
11
12
13
14
15
16
17
18
19
20
21
22
23
24
25
26
27
28
29
30
31
32
33
34
35
36
37
38
39
40
41
42
43
44
45
46
47
48
49
50
51
52
53
54
55
56
57
58
59
60
61
62
63
64
65
66
67
68
69
70
71
72
73
74
75
76
77
78
79
80
81
82
83
重新打包webpack或npn run build。访问
# plugin
plugin 与 loader 区别:
- loader:用于转换某些类型的模块,是转换器
- plugin:是对 webpack 本身的扩展,是扩展器
使用步骤:
- npm 安装(某些 webpack 内置的无需安装)
- 在 webpack.config.js 中的 plugins 配置
# banner
webpack 自带,只需配置好
// 这个会从 node 中查找,需要 npm init 来生成 package.json
const path = require('path')
const VueLoaderPlugin = require('vue-loader/lib/plugin')

module.exports = {
  entry: './src/main.js',
  output: {
    // path 需要写绝对路径,但又不能直接指定,可以动态获取(采用 node 语法)
    path: path.resolve(__dirname, 'dist'),
    filename: 'bundle.js',
    // 输出涉及url时,会自动在前面添加该字符串。实际中,会把所有文件都打包到 dist 中,此时应该删掉publicPath配置
    publicPath: 'dist/',
  },
  module: {
    rules: [
      {
        // 匹配.css文件
        test: /\.css$/i,

        // style-loader 将模块导出作为style添加到DOM中
        // css-loader解析css文件后,使用import加载,并返回css代码
        // 使用多个loader时,从右到左加载。顺序不能乱!
        use: ['style-loader', 'css-loader'],
      },
      {
        test: /\.less$/,
        use: [
          {
            loader: 'style-loader', // creates style nodes from JS strings
          },
          {
            loader: 'css-loader', // translates CSS into CommonJS
          },
          {
            loader: 'less-loader', // compiles Less to CSS
          },
        ],
      },
      {
        test: /\.(png|jpg|gif|jpeg)$/,
        use: [
          {
            loader: 'url-loader',
            options: {
              // 当图片大小小于 limit 时,会被编译为base64字符串
              // 当大于 limit 时,会使用 file-loader 进行加载,仅需要安装!
              limit: 10000,
              // img/目录下,[name]为原名,[hash:8]为8位哈希值,.[ext]为后缀
              name: 'img/[name][hash:8].[ext]',
            },
          },
        ],
      },
      {
        test: /\.js$/,
        // 排除
        exclude: /(node_modules|bower_components)/,
        use: {
          loader: 'babel-loader',
          options: {
            presets: ['es2015'],
          },
        },
      },
      {
        test: /\.vue$/,
        loader: 'vue-loader',
      },
    ],
  },
  resolve: {
    // 在 .vue 文件中导入如下文件时可以省略后缀
    extensions: ['.js', '.vue', '.css'],
    alias: {
      // 指定发布的版本
      vue$: 'vue/dist/vue.esm.js', // 用 webpack 1 时需用 'vue/dist/vue.common.js'
    },
  },
  plugins: [
    // 请确保引入这个插件!
    new VueLoaderPlugin(),
  ],
}
2
3
4
5
6
7
8
9
10
11
12
13
14
15
16
17
18
19
20
21
22
23
24
25
26
27
28
29
30
31
32
33
34
35
36
37
38
39
40
41
42
43
44
45
46
47
48
49
50
51
52
53
54
55
56
57
58
59
60
61
62
63
64
65
66
67
68
69
70
71
72
73
74
75
76
77
78
79
80
81
82
83
重新打包webpack或npn run build。查看 bundle.js 文件
# HtmlWebpackPlugin 🔥
目前我们的 index.html 文件在根目录下,且打包后也是在原位置,而实际真实发布项目时,发布的是 dist 目录中的内容,但是其中并没有 index.html,只能复制过去。所以我们需要可以将 index.html 打包到 dist 目录的插件。
HtmlWebpackPlugin 插件可以做:
- 自动生成一个 index.html(可指定模板)
- 将打包的 js 文件,自动通过 script 标签插入到 index.html 的 body 中
使用步骤:
安装(只开发时依赖)由于 webpack 版本为 3.6.*,所以此处需要安装指定版本的
npm install html-webpack-plugin@3.2.0 --save-dev1修改 webpack.config.js 中 plugins 内容
注意删掉
publicPath// 这个会从 node 中查找,需要 npm init 来生成 package.json const path = require('path') const VueLoaderPlugin = require('vue-loader/lib/plugin') const webpack = require('webpack') const htmlWebpackPlugin = require('html-webpack-plugin') module.exports = { entry: './src/main.js', output: { // path 需要写绝对路径,但又不能直接指定,可以动态获取(采用 node 语法) path: path.resolve(__dirname, 'dist'), filename: 'bundle.js', // 输出涉及url时,会自动在前面添加该字符串。实际中,会把所有文件都打包到 dist 中,此时应该删掉publicPath配置 // publicPath: "dist/", }, module: { rules: [ { // 匹配.css文件 test: /\.css$/i, // style-loader 将模块导出作为style添加到DOM中 // css-loader解析css文件后,使用import加载,并返回css代码 // 使用多个loader时,从右到左加载。顺序不能乱! use: ['style-loader', 'css-loader'], }, { test: /\.less$/, use: [ { loader: 'style-loader', // creates style nodes from JS strings }, { loader: 'css-loader', // translates CSS into CommonJS }, { loader: 'less-loader', // compiles Less to CSS }, ], }, { test: /\.(png|jpg|gif|jpeg)$/, use: [ { loader: 'url-loader', options: { // 当图片大小小于 limit 时,会被编译为base64字符串 // 当大于 limit 时,会使用 file-loader 进行加载,仅需要安装! limit: 10000, // img/目录下,[name]为原名,[hash:8]为8位哈希值,.[ext]为后缀 name: 'img/[name][hash:8].[ext]', }, }, ], }, { test: /\.js$/, // 排除 exclude: /(node_modules|bower_components)/, use: { loader: 'babel-loader', options: { presets: ['es2015'], }, }, }, { test: /\.vue$/, loader: 'vue-loader', }, ], }, resolve: { // 在 .vue 文件中导入如下文件时可以省略后缀 extensions: ['.js', '.vue', '.css'], alias: { // 指定发布的版本 vue$: 'vue/dist/vue.esm.js', // 用 webpack 1 时需用 'vue/dist/vue.common.js' }, }, plugins: [ // 请确保引入这个插件! new VueLoaderPlugin(), // banner插件 new webpack.BannerPlugin('最终版权归conanan所有'), // htmlWebpackPlugin 插件 new htmlWebpackPlugin({ template: 'index.html', }), ], }1
2
3
4
5
6
7
8
9
10
11
12
13
14
15
16
17
18
19
20
21
22
23
24
25
26
27
28
29
30
31
32
33
34
35
36
37
38
39
40
41
42
43
44
45
46
47
48
49
50
51
52
53
54
55
56
57
58
59
60
61
62
63
64
65
66
67
68
69
70
71
72
73
74
75
76
77
78
79
80
81
82
83
84
85
86
87
88
89
90
91重新打包
webpack或npn run build。查看 index.html 文件
# uglifyjs 压缩 🔥
安装(由于 webpack 版本及 CLI2,遂选择该版本)
还是报错,我看 node_modules 中好像自带了,只需配置即可食用
npm install uglifyjs-webpack-plugin@1.1.1 --save-dev1修改 webpack.config.js 中 plugins 内容
// 这个会从 node 中查找,需要 npm init 来生成 package.json
const path = require('path')
const VueLoaderPlugin = require('vue-loader/lib/plugin')
const webpack = require('webpack')
const htmlWebpackPlugin = require('html-webpack-plugin')
const uglifyjsWebpackPlugin = require('uglifyjs-webpack-plugin')

module.exports = {
  entry: './src/main.js',
  output: {
    // path 需要写绝对路径,但又不能直接指定,可以动态获取(采用 node 语法)
    path: path.resolve(__dirname, 'dist'),
    filename: 'bundle.js',
    // 输出涉及url时,会自动在前面添加该字符串。实际中,会把所有文件都打包到 dist 中,此时应该删掉publicPath配置
    // publicPath: "dist/",
  },
  module: {
    rules: [
      {
        // 匹配.css文件
        test: /\.css$/i,

        // style-loader 将模块导出作为style添加到DOM中
        // css-loader解析css文件后,使用import加载,并返回css代码
        // 使用多个loader时,从右到左加载。顺序不能乱!
        use: ['style-loader', 'css-loader'],
      },
      {
        test: /\.less$/,
        use: [
          {
            loader: 'style-loader', // creates style nodes from JS strings
          },
          {
            loader: 'css-loader', // translates CSS into CommonJS
          },
          {
            loader: 'less-loader', // compiles Less to CSS
          },
        ],
      },
      {
        test: /\.(png|jpg|gif|jpeg)$/,
        use: [
          {
            loader: 'url-loader',
            options: {
              // 当图片大小小于 limit 时,会被编译为base64字符串
              // 当大于 limit 时,会使用 file-loader 进行加载,仅需要安装!
              limit: 10000,
              // img/目录下,[name]为原名,[hash:8]为8位哈希值,.[ext]为后缀
              name: 'img/[name][hash:8].[ext]',
            },
          },
        ],
      },
      {
        test: /\.js$/,
        // 排除
        exclude: /(node_modules|bower_components)/,
        use: {
          loader: 'babel-loader',
          options: {
            presets: ['es2015'],
          },
        },
      },
      {
        test: /\.vue$/,
        loader: 'vue-loader',
      },
    ],
  },
  resolve: {
    // 在 .vue 文件中导入如下文件时可以省略后缀
    extensions: ['.js', '.vue', '.css'],
    alias: {
      // 指定发布的版本
      vue$: 'vue/dist/vue.esm.js', // 用 webpack 1 时需用 'vue/dist/vue.common.js'
    },
  },
  plugins: [
    // 请确保引入这个插件!
    new VueLoaderPlugin(),
    // banner插件
    new webpack.BannerPlugin('最终版权归conanan所有'),
    // htmlWebpackPlugin 插件
    new htmlWebpackPlugin({
      template: 'index.html',
    }),
    // uglifyjsWebpackPlugin 插件
    new uglifyjsWebpackPlugin(),
  ],
}
1
2
3
4
5
6
7
8
9
10
11
12
13
14
15
16
17
18
19
20
21
22
23
24
25
26
27
28
29
30
31
32
33
34
35
36
37
38
39
40
41
42
43
44
45
46
47
48
49
50
51
52
53
54
55
56
57
58
59
60
61
62
63
64
65
66
67
68
69
70
71
72
73
74
75
76
77
78
79
80
81
82
83
84
85
86
87
88
89
90
91
92
93
94重新打包
webpack或npn run build。查看 bundle.js 文件
# webpack-dev-server 🔥
webpack 提供了一个可选的本地开发服务器,基于 node 搭建,内部使用 express 框架,可以实现浏览器自动“刷新”显示我们修改后的结果。不过它是一个单独的模块,需要先安装。
安装(版本号还是由于 webpack 3.6.*)
npm install webpack-dev-server@2.9.1 --save-dev1修改 webpack.config.js 中 devServer 内容
// 这个会从 node 中查找,需要 npm init 来生成 package.json
const path = require('path')
const VueLoaderPlugin = require('vue-loader/lib/plugin')
const webpack = require('webpack')
const htmlWebpackPlugin = require('html-webpack-plugin')
const uglifyjsWebpackPlugin = require('uglifyjs-webpack-plugin')

module.exports = {
  entry: './src/main.js',
  output: {
    // path 需要写绝对路径,但又不能直接指定,可以动态获取(采用 node 语法)
    path: path.resolve(__dirname, 'dist'),
    filename: 'bundle.js',
    // 输出涉及url时,会自动在前面添加该字符串。实际中,会把所有文件都打包到 dist 中,此时应该删掉publicPath配置
    // publicPath: "dist/",
  },
  module: {
    rules: [
      {
        // 匹配.css文件
        test: /\.css$/i,

        // style-loader 将模块导出作为style添加到DOM中
        // css-loader解析css文件后,使用import加载,并返回css代码
        // 使用多个loader时,从右到左加载。顺序不能乱!
        use: ['style-loader', 'css-loader'],
      },
      {
        test: /\.less$/,
        use: [
          {
            loader: 'style-loader', // creates style nodes from JS strings
          },
          {
            loader: 'css-loader', // translates CSS into CommonJS
          },
          {
            loader: 'less-loader', // compiles Less to CSS
          },
        ],
      },
      {
        test: /\.(png|jpg|gif|jpeg)$/,
        use: [
          {
            loader: 'url-loader',
            options: {
              // 当图片大小小于 limit 时,会被编译为base64字符串
              // 当大于 limit 时,会使用 file-loader 进行加载,仅需要安装!
              limit: 10000,
              // img/目录下,[name]为原名,[hash:8]为8位哈希值,.[ext]为后缀
              name: 'img/[name][hash:8].[ext]',
            },
          },
        ],
      },
      {
        test: /\.js$/,
        // 排除
        exclude: /(node_modules|bower_components)/,
        use: {
          loader: 'babel-loader',
          options: {
            presets: ['es2015'],
          },
        },
      },
      {
        test: /\.vue$/,
        loader: 'vue-loader',
      },
    ],
  },
  resolve: {
    // 在 .vue 文件中导入如下文件时可以省略后缀
    extensions: ['.js', '.vue', '.css'],
    alias: {
      // 指定发布的版本
      vue$: 'vue/dist/vue.esm.js', // 用 webpack 1 时需用 'vue/dist/vue.common.js'
    },
  },
  plugins: [
    // 请确保引入这个插件!
    new VueLoaderPlugin(),
    // banner插件
    new webpack.BannerPlugin('最终版权归conanan所有'),
    // htmlWebpackPlugin 插件
    new htmlWebpackPlugin({
      template: 'index.html',
    }),
    // uglifyjsWebpackPlugin 插件
    new uglifyjsWebpackPlugin(),
  ],
  devServer: {
    // 为那个目录提供本地服务,默认是项目根目录
    contentBase: './dist',
    // 页面实时刷新
    inline: true,
    // 端口
    port: 9999,
    // 在SPA中,依赖H5的history模式
    // historyApiFallback,
  },
}
1
2
3
4
5
6
7
8
9
10
11
12
13
14
15
16
17
18
19
20
21
22
23
24
25
26
27
28
29
30
31
32
33
34
35
36
37
38
39
40
41
42
43
44
45
46
47
48
49
50
51
52
53
54
55
56
57
58
59
60
61
62
63
64
65
66
67
68
69
70
71
72
73
74
75
76
77
78
79
80
81
82
83
84
85
86
87
88
89
90
91
92
93
94
95
96
97
98
99
100
101
102
103
104执行
webpack-dev-server发现没有该命令,原因是安装到本地,可以在 package.json 中配置 scripts,即可实现默认查找本地 node_modules 中命令。--open可以在服务启动后自动打开浏览器{ "scripts": { "dev": "webpack-dev-server --open" } }1
2
3
4
5但是发现无法启动,报错
ERROR in bundle.js from UglifyJs
Unexpected token: name (urlParts) [bundle.js:4153,4]
1
2参考这个博客 (opens new window),虽然可以启动了,但是修改文件后还是报错。算了(所以目前代码 5 webpack-plugins 可能有问题,接下来就解决了)
# 配置文件分离 🔥
这里就有问题了,webpack.config.js 中的配置,有些是开发模式需要的,有些才是发布模式需要的,如何分离?并且开发模式时使用 uglifyjs 插件会无法调试,如何解决?此时需要 webpack 的配置文件分离。
安装依赖
npm install webpack-merge --save-dev1build/base.config.js。注意 output 目录的改变
// 基础依赖
// 这个会从 node 中查找,需要 npm init 来生成 package.json
const path = require('path')
const VueLoaderPlugin = require('vue-loader/lib/plugin')
const webpack = require('webpack')
const htmlWebpackPlugin = require('html-webpack-plugin')

module.exports = {
  entry: './src/main.js',
  output: {
    // path 需要写绝对路径,但又不能直接指定,可以动态获取(采用 node 语法)
    // 配置文件分离后需要修改 path
    path: path.resolve(__dirname, '../dist'),
    filename: 'bundle.js',
    // 输出涉及url时,会自动在前面添加该字符串。实际中,会把所有文件都打包到 dist 中,此时应该删掉publicPath配置
    // publicPath: "dist/",
  },
  module: {
    rules: [
      {
        // 匹配.css文件
        test: /\.css$/i,

        // style-loader 将模块导出作为style添加到DOM中
        // css-loader解析css文件后,使用import加载,并返回css代码
        // 使用多个loader时,从右到左加载。顺序不能乱!
        use: ['style-loader', 'css-loader'],
      },
      {
        test: /\.less$/,
        use: [
          {
            loader: 'style-loader', // creates style nodes from JS strings
          },
          {
            loader: 'css-loader', // translates CSS into CommonJS
          },
          {
            loader: 'less-loader', // compiles Less to CSS
          },
        ],
      },
      {
        test: /\.(png|jpg|gif|jpeg)$/,
        use: [
          {
            loader: 'url-loader',
            options: {
              // 当图片大小小于 limit 时,会被编译为base64字符串
              // 当大于 limit 时,会使用 file-loader 进行加载,仅需要安装!
              limit: 10000,
              // img/目录下,[name]为原名,[hash:8]为8位哈希值,.[ext]为后缀
              name: 'img/[name][hash:8].[ext]',
            },
          },
        ],
      },
      {
        test: /\.js$/,
        // 排除
        exclude: /(node_modules|bower_components)/,
        use: {
          loader: 'babel-loader',
          options: {
            presets: ['es2015'],
          },
        },
      },
      {
        test: /\.vue$/,
        loader: 'vue-loader',
      },
    ],
  },
  resolve: {
    // 在 .vue 文件中导入如下文件时可以省略后缀
    extensions: ['.js', '.vue', '.css'],
    alias: {
      // 指定发布的版本
      vue$: 'vue/dist/vue.esm.js', // 用 webpack 1 时需用 'vue/dist/vue.common.js'
    },
  },
  plugins: [
    // 请确保引入这个插件!
    new VueLoaderPlugin(),
    // banner插件
    new webpack.BannerPlugin('最终版权归conanan所有'),
    // htmlWebpackPlugin 插件
    new htmlWebpackPlugin({
      template: 'index.html',
    }),
  ],
}
1
2
3
4
5
6
7
8
9
10
11
12
13
14
15
16
17
18
19
20
21
22
23
24
25
26
27
28
29
30
31
32
33
34
35
36
37
38
39
40
41
42
43
44
45
46
47
48
49
50
51
52
53
54
55
56
57
58
59
60
61
62
63
64
65
66
67
68
69
70
71
72
73
74
75
76
77
78
79
80
81
82
83
84
85
86
87
88
89
90
91
92
93build/dev.config.js
// 开发时配置
const baseConfig = require('./base.config')
const webpackMerge = require('webpack-merge')

module.exports = webpackMerge(baseConfig, {
  devServer: {
    // 为那个目录提供本地服务,默认是项目根目录
    contentBase: './dist',
    // 页面实时刷新
    inline: true,
    // 端口
    port: 9999,
    // 在SPA中,依赖H5的history模式
    // historyApiFallback,
  },
})
1
2
3
4
5
6
7
8
9
10
11
12
13
14
15
16build/prod.config.js
// 生产时依赖
const uglifyjsWebpackPlugin = require('uglifyjs-webpack-plugin')
const baseConfig = require('./base.config')
const webpackMerge = require('webpack-merge')

module.exports = webpackMerge(baseConfig, {
  plugins: [
    // uglifyjsWebpackPlugin 插件
    new uglifyjsWebpackPlugin(),
  ],
})
1
2
3
4
5
6
7
8
9
10
11删掉之前的 webpack.config.js,此时命令就不能使用了,需要修改配置 package.json
{
  "scripts": {
    "dev": "webpack-dev-server --open --config ./build/dev.config.js",
    "build": "webpack --config ./build/prod.config.js"
  }
}
1
2
3
4
5
6执行上述命令,发现一切都好了!😄
# 其他(旧)
webpack-dev-server 开发服务器,它的功能可以实现热加载并且自动刷新浏览器。
创建一个新的程序目录,这里我们创建
webpacktest目录,将 webpack 入门程序的代码拷贝进来,并在目录下创建src目录、dist目录。将main.js,module01.js和vue.min.js拷贝到 src 目录。html 文件拷贝到当前目录下。使用 webpack-dev-server 需要安装 webpack、 webpack-dev-server和 html-webpack-plugin三个包在当前程序目录
cnpm install webpack@3.6.0 webpack-dev-server@2.9.1 html-webpack-plugin@2.30.1 --save-dev安装完成后程序目录出现**
package.json文件**,此文件中记录了程序的依赖信息(上面三个)还有**
node_modules文件夹**,有 993 个文件或文件夹!!!存放本程序所依赖的包!配置 webpack-dev-server,在
package.json中配置 script(运行命令),最终内容如下{ "scripts": { "dev": "webpack-dev-server --inline --hot --open --port 5008" }, "devDependencies": { "html-webpack-plugin": "^2.30.1", "webpack": "^3.6.0", "webpack-dev-server": "^2.9.1" } }1
2
3
4
5
6
7
8
9
10scripts:可执行的命令--inline:自动刷新;--hot:热加载;--open:自动在默认浏览器打开;--port:指定端口;--host:可以指定服务器的 ip,不指定则为 127.0.0.1,如果对外发布则填写公网 ip 地址devDependencies:开发人员在开发过程中所需要的依赖配置
webpack.config.js,是 webpack 的配置文件,在此文件中可以配置应用的入口文件、输出配置、插件等,其中要实现热加载自动刷新功能需要配置 html-webpack-plugin 插件。html-webpack-plugin 的作用是根据 html 模板在内存生成 html 文件,它的工作原理是根据模板文件在内存中生成一个 index.html 文件。配置模板文件。将原来的
vue.html作为模板文件,为了和内存中的index.html文件名区别,注意将vue.html中的所有script标签去掉在
webpack.config.js(与package.json同目录)中配置html-webpack-plugin插件//引用html-webpack-plugin插件,作用是根据html模板在内存生成html文件,它的工作原理是根据模板文件在内存中生成一个index.html文件。 var htmlwp = require('html-webpack-plugin') module.exports = { entry: './src/main.js', //指定打包的入口文件 output: { path: __dirname + '/dist', // 注意:__dirname表示webpack.config.js所在目录的绝对路径 filename: 'build.js', //输出文件 }, devtool: 'eval-source-map', //Debug调试 plugins: [ new htmlwp({ title: '首页', //生成的页面标题<head><title>首页</title></head> filename: 'index.html', //webpack-dev-server在内存中生成的文件名称,自动将build注入到这个页面底部,才能实现自动刷新功能 template: 'vue.html', //根据vue.html这个模板来生成(这个文件请程序员自己生成) }), ], }1
2
3
4
5
6
7
8
9
10
11
12
13
14
15
16
17
运行
在
webpacktest目录,执行**npm run dev**。或使用 webstorm,右键
package.json文件,选择“Show npm Scripts”,双击 dev 即可【注意】dev 就是在
package.json中配置的webpack-dev-server......命令。启动成功自动打开浏览器。修改 src 中的任意文件内容,自动加载并刷新浏览器。
Debug 调试
使用了 webpack 之后就不能采用传统 js 的调试方法在 chrome 中打断点(因为打包了!内容发生变化)
webpack 提供 devtool 进行调试,它是基于 sourcemap 的方式,在调试时会生成一个 map 文件,其内容记录生成文件和源文件的内容映射,即生成文件中的哪个位置对应源文件中的哪个位置,有了 sourcemap 就可以在调试时看到源代码。
- 在 webpack.config.js 中配置:
devtool: 'eval‐source‐map',具体查看上面的代码 - 在 js 中跟踪代码的位置上添加debugger,开启浏览器开发者工具……
- 在 webpack.config.js 中配置: